
Let’s start from the beginning. I was a new learner into this world of web development who’d just learned to program in the NodeJS environment. I’d made a couple of projects from scratch which strengthened my WebDev skills, but I knew what I struggled the most in: Front-End. You could enjoy your hours in making the back-end of your site work and feel really rejoiced at some optimised code of yours, but once you start for Front-End, you can end up wasting a day or a two, only to discover that the brilliant object of your creation is just one web page, or just a small section of it.
What I didn’t know
I must clarify for all the ‘JS Experts’ reading this that no, I don’t know any of the React, Angular or Vue frameworks and yes, I still make websites the trivial ‘static’ way: the manual HTML & CSS coding which takes hours and hours to polish out, and your page still doesn’t look great. Well, I used to, actually. I realised eventually that I love back-end and I need to do something which makes me design my web pages faster and more efficiently.
The hunt begins
So I went on looking over the internet for Designing tools. The internet gave me resources which the most brilliant Uplabs, Pinterest, and Dribbble post-makers used to make their masterpieces. Sketch, Figma, a lot of names came up. I decided to go for Figma, but it was exactly what I had googled for, too exact, to be honest. It was just a designing tool, and there was no way I could get the HTML, CSS code from it. At least, I didn’t find any way to.
These applications were design focussed, and I wanted something development focussed. Somewhere between being disappointed and learning how to use Figma, I stumbled upon something known as Webflow.
When you find the Perfect One
So, I open Webflow and they ask me to choose a template. Okay, playful memories of Wordpress come to my mind, until I move on to the next step. A brilliant environment opens up, much like Figma, but, instead of adding shapes or figures, you have the option to add…wait for it… HTML elements!
I might not be good at defining stuff properly, but if ever you ask me the difference between a Design-focussed and Development-focussed environment, I’ll simply push forward links of Figma and Webflow towards you. And if you are a Front-End developer, believe me, Webflow is The Place for you.
Webflow
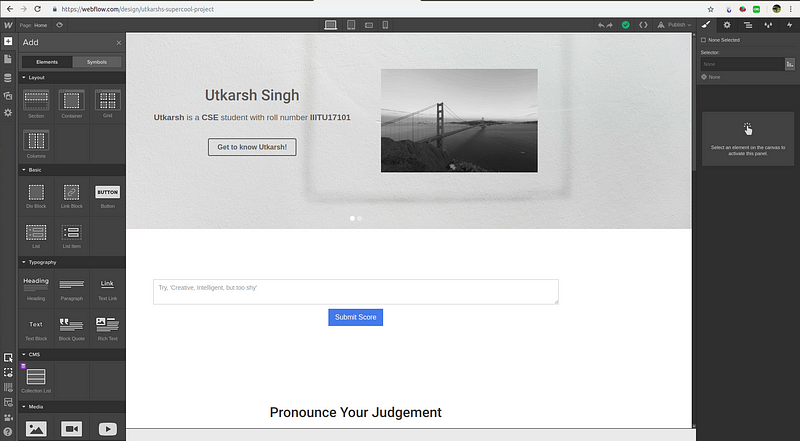
Just look at that left pane in the picture. That’s exactly what I wanted! Needless to say, I designed all my web pages with the help of this and they were literally my career best designs! Of course, I spent an entire day on designing and learning this, but at the end of the day, seeing my work done, I was content. I had made a web page, but this one looked far better than any I had ever created. No CSS margin, padding, or hex colour nonsense, nothing. You want something, you can directly drag and drop the element, colour it, and resize it. Imagine how much time can be saved by all these features.
You came in, now you’ve to get out
Okay, you designed your page very well, and you’re impressed by your own work. Now you’ve to get back to your base. Get your entire HTML, CSS code into your home project which is waiting inside Node. So you click on the top right button to extract the Code, but…
They won’t give you your code! Yes, the standard blabbering of ‘Oh, you want this? Buy us and live your life in peace!’ Now, I have no problem in buying plans and giving these creative companies the money they deserve, and I will one day. But here’s my philosophy, I’m a student with practically no earning who is complete dependent for resources on my parents. Until and unless I have money under my own belt to spend recklessly, I’ll usually refrain from buying anything unless it’s extremely important. (Yes, I’m cultural and I’m an Indian)
So now it’s time to cheat on Webflow. They don’t give you the source code of your design, but they do allow one thing, they allow you to publish your code. So you get a standard URL as in Github Page which is basically your project-name.weblow.io.
What I did was simply publish my web page. I opened the web page, opened the source code of it, clicked on the included CSS file, copied that, and took away all of that code into my Node project. That’s it. That’s all I did. Tried to make it really filmy and suspensive, but alas, now you see it wasn’t that awesome.
So this is it. I just wanted to share this amazing technology that I found, and which every Front End developer should use if they want to save time in developing their designs.
Thank You for Reading!
Hello Utkarsh what's up?
ReplyDeleteThanks Nina
ReplyDelete